はじめに
業務で負荷テストツール「Locust」を使う機会があり、AWS ECS Fargate上でLocustを動かして、APIに負荷をかける検証をやってみました。
Locustを使えばPythonで簡単に負荷テストのシナリオを書けるんです。
さらにECS Fargateで動かすことで、サーバー管理不要で大規模な負荷テストも可能になります。
私も初めて使ってみたので、一つ一つ丁寧に解説したいと思います!
目次
- この記事でわかること
- 構成概要
- API Gateway + Lambda の準備
- Locustテストシナリオの作成
- Dockerイメージの作成
- ECS環境の構築
- 負荷テストの実行
- 負荷テストの結果確認
- まとめ
この記事でわかること
- Locustとは何か
- ECS Fargateで負荷テストを実行するメリット
- Dockerイメージの作成方法
- ECSでの実行方法
- 負荷テストの結果の見方
前提条件
- AWSアカウントを持っている
- Dockerの基本的な知識がある
- Pythonの基礎知識がある(読めればOK)
Locustとは?
Locustは、Pythonで書かれたオープンソースの負荷テストツールです。
Locustの特徴
- Pythonで書ける: 複雑なシナリオもPythonコードで表現できる
- WebUIが使いやすい: ブラウザから負荷テストの状況をリアルタイムで確認できる
- 分散実行が可能: 複数のワーカーで大規模な負荷テストができる
- 軽量: 1台のマシンで数千ユーザーをシミュレートできる
なぜECS Fargateで動かすのか?
メリット
- サーバー管理不要: EC2インスタンスの管理が不要
- スケーラブル: 必要に応じてタスク数を増やせる
- コスト効率: 使った分だけの課金
- 再現性: Dockerイメージで環境を固定できる
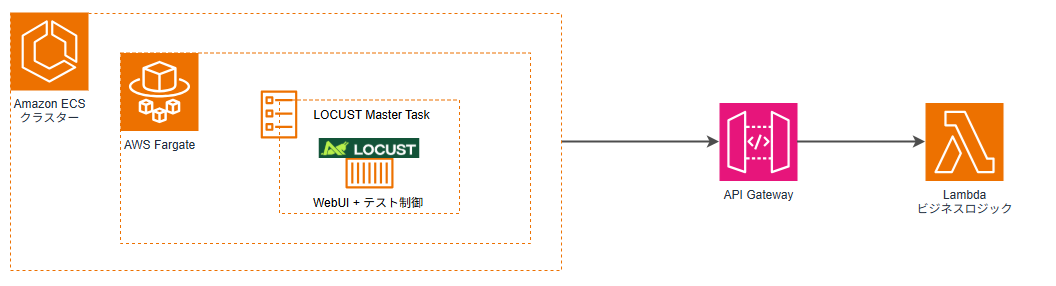
構成
テスト対象APIの準備(API Gateway + Lambda)
負荷テストの対象となるAPIを用意します。
Lambda関数とAPI Gatewayの作成
Lambda関数とAPI Gatewayを作成します。
Lambda関数の準備
|
1 2 3 4 5 6 7 8 9 10 11 12 13 14 15 16 17 18 19 20 21 22 23 24 25 26 27 28 29 30 31 32 33 34 35 36 37 38 39 40 41 42 43 44 45 46 47 48 49 50 51 52 53 54 55 56 57 58 59 60 61 62 63 64 65 66 67 68 69 70 71 72 73 74 75 76 77 78 79 80 81 82 83 84 85 86 87 88 89 90 91 92 93 94 95 |
import json def lambda_handler(event, context): # HTTP API v2の場合のパス取得 path = event.get('rawPath', event.get('path', '')) method = event.get('requestContext', {}).get('http', {}).get('method', event.get('httpMethod', '')) # CORSヘッダー headers = { 'Content-Type': 'application/json', 'Access-Control-Allow-Origin': '*', 'Access-Control-Allow-Methods': 'GET, POST, PUT, DELETE, OPTIONS', 'Access-Control-Allow-Headers': 'Content-Type, Authorization' } # OPTIONSリクエスト(CORS preflight) if method == 'OPTIONS': return { 'statusCode': 200, 'headers': headers, 'body': '' } # ルートパス if path == '/' and method == 'GET': return { 'statusCode': 200, 'headers': headers, 'body': json.dumps({'message': 'API is running', 'endpoints': ['/api/users']}) } # ユーザー一覧取得 if path == '/api/users' and method == 'GET': return { 'statusCode': 200, 'headers': headers, 'body': json.dumps([ {'id': 1, 'name': 'User 1', 'email': 'user1@example.com'}, {'id': 2, 'name': 'User 2', 'email': 'user2@example.com'} ]) } # ユーザー詳細取得 if path.startswith('/api/users/') and method == 'GET': user_id = path.split('/')[-1] try: return { 'statusCode': 200, 'headers': headers, 'body': json.dumps({ 'id': int(user_id), 'name': f'User {user_id}', 'email': f'user{user_id}@example.com' }) } except ValueError: return { 'statusCode': 400, 'headers': headers, 'body': json.dumps({'error': 'Invalid user ID'}) } # ユーザー作成 if path == '/api/users' and method == 'POST': try: body = json.loads(event.get('body', '{}')) return { 'statusCode': 201, 'headers': headers, 'body': json.dumps({ 'id': 999, 'name': body.get('name'), 'email': body.get('email') }) } except json.JSONDecodeError: return { 'statusCode': 400, 'headers': headers, 'body': json.dumps({'error': 'Invalid JSON'}) } # デバッグ情報を含む404レスポンス return { 'statusCode': 404, 'headers': headers, 'body': json.dumps({ 'error': 'Not Found', 'debug': { 'path': path, 'method': method, 'event_keys': list(event.keys()) } }) } |
API Gatewayの準備
方法1: SAMテンプレートを使用
|
1 2 3 4 5 6 7 8 9 10 11 12 13 14 15 16 17 18 19 20 21 22 23 24 25 26 27 28 29 |
AWSTemplateFormatVersion: '2010-09-09' Transform: AWS::Serverless-2016-10-31 Description: 'API Gateway + Lambda for Locust Load Test' Resources: ApiFunction: Type: AWS::Serverless::Function Properties: FunctionName: locust-test-api Runtime: python3.9 Handler: lambda_function.lambda_handler CodeUri: ./ Timeout: 30 Events: ApiEvent: Type: HttpApi Properties: Path: /{proxy+} Method: ANY RootEvent: Type: HttpApi Properties: Path: / Method: ANY Outputs: ApiEndpoint: Value: !Sub 'https://${ServerlessHttpApi}.execute-api.${AWS::Region}.amazonaws.com' Description: API Gateway endpoint URL |
デプロイ
|
1 2 3 4 5 6 7 8 9 10 11 12 13 14 15 16 17 18 |
# S3バケット作成 BUCKET_NAME="locust-deploy-$(date +%s)" aws s3 mb s3://$BUCKET_NAME # パッケージ化 aws cloudformation package \ --template-file template.yaml \ --s3-bucket $BUCKET_NAME \ --output-template-file packaged-template.yaml # デプロイ aws cloudformation deploy \ --template-file packaged-template.yaml \ --stack-name locust-test-api \ --capabilities CAPABILITY_IAM # S3バケット削除 aws s3 rb s3://$BUCKET_NAME --force |
方法2: CloudFormationテンプレートを使用
|
1 2 3 4 5 6 7 8 9 10 11 12 13 14 15 16 17 18 19 20 21 22 23 24 25 26 27 28 29 30 31 32 33 34 35 36 37 38 39 40 41 42 43 44 45 46 47 48 49 50 51 52 53 54 55 56 57 58 59 60 61 62 63 64 65 66 67 68 69 70 71 72 73 74 75 76 |
AWSTemplateFormatVersion: '2010-09-09' Description: 'API Gateway + Lambda for Locust Load Test' Resources: ApiFunction: Type: AWS::Lambda::Function Properties: FunctionName: locust-test-api Runtime: python3.9 Handler: index.lambda_handler Code: ZipFile: | # Lambda関数のコードをここに記載(上記のlambda_function.pyの内容) Role: !GetAtt LambdaExecutionRole.Arn Timeout: 30 LambdaExecutionRole: Type: AWS::IAM::Role Properties: AssumeRolePolicyDocument: Version: '2012-10-17' Statement: - Effect: Allow Principal: Service: lambda.amazonaws.com Action: sts:AssumeRole ManagedPolicyArns: - arn:aws:iam::aws:policy/service-role/AWSLambdaBasicExecutionRole ApiGateway: Type: AWS::ApiGatewayV2::Api Properties: Name: locust-test-api ProtocolType: HTTP ApiIntegration: Type: AWS::ApiGatewayV2::Integration Properties: ApiId: !Ref ApiGateway IntegrationType: AWS_PROXY IntegrationUri: !GetAtt ApiFunction.Arn PayloadFormatVersion: '2.0' ApiRouteProxy: Type: AWS::ApiGatewayV2::Route Properties: ApiId: !Ref ApiGateway RouteKey: 'ANY /{proxy+}' Target: !Join ['/', ['integrations', !Ref ApiIntegration]] ApiRouteRoot: Type: AWS::ApiGatewayV2::Route Properties: ApiId: !Ref ApiGateway RouteKey: 'ANY /' Target: !Join ['/', ['integrations', !Ref ApiIntegration]] ApiStage: Type: AWS::ApiGatewayV2::Stage Properties: ApiId: !Ref ApiGateway StageName: $default AutoDeploy: true LambdaPermission: Type: AWS::Lambda::Permission Properties: FunctionName: !Ref ApiFunction Action: lambda:InvokeFunction Principal: apigateway.amazonaws.com SourceArn: !Sub 'arn:aws:execute-api:${AWS::Region}:${AWS::AccountId}:${ApiGateway}/*' Outputs: ApiEndpoint: Value: !GetAtt ApiGateway.ApiEndpoint Description: API Gateway endpoint URL |
デプロイ
|
1 2 3 4 5 |
# 直接デプロイ aws cloudformation deploy \ --template-file api-gateway.yaml \ --stack-name locust-test-api \ --capabilities CAPABILITY_IAM |
エンドポイントURLの取得
|
1 2 3 4 |
aws cloudformation describe-stacks \ --stack-name locust-test-api \ --query 'Stacks[0].Outputs[?OutputKey==<code>ApiEndpoint</code>].OutputValue' \ --output text |
出力例: https://abc123.execute-api.ap-northeast-1.amazonaws.com
Locustテストシナリオの作成
負荷テストのシナリオをPythonで作成します。
locustfile_api_test.pyを作成
|
1 2 3 4 5 6 7 8 9 10 11 12 13 14 15 16 17 18 19 20 21 22 |
from locust import HttpUser, task, between class APIUser(HttpUser): wait_time = between(1, 3) @task(3) def get_users(self): """ユーザー一覧取得API""" self.client.get("/api/users") @task(2) def get_user_detail(self): """ユーザー詳細取得API""" self.client.get("/api/users/1") @task(1) def create_user(self): """ユーザー作成API""" self.client.post("/api/users", json={ "name": "Test User", "email": "test@example.com" }) |
ポイント解説
HttpUser: HTTP/HTTPSリクエストを送るユーザーの基底クラス@task(数値): 負荷テストで実行するタスクを定義。数値は実行頻度の重み(3:2:1の比率で実行)wait_time: リクエスト間の待機時間(実際のユーザー行動をシミュレート)on_start: 各ユーザーの初期化処理(後述)
on_startメソッドについて
今回のシナリオでは使用していませんが、認証が必要なAPIをテストする場合に重要です。
使用例:ログイン認証が必要な場合
|
1 2 3 4 5 6 7 8 9 10 11 12 13 14 15 16 17 18 |
class APIUser(HttpUser): wait_time = between(1, 3) def on_start(self): """各ユーザーの初期化処理(最初に1回だけ実行)""" # ログインしてトークンを取得 response = self.client.post("/api/login", json={ "username": "testuser", "password": "password123" }) self.token = response.json()["token"] @task def get_protected_resource(self): """認証が必要なAPIを呼び出す""" self.client.get("/api/protected", headers={ "Authorization": f"Bearer {self.token}" }) |
on_startの用途
- ログイン処理
- 認証トークンの取得
- テストデータの準備
- セッションの初期化
Dockerイメージの作成
次に、Locustを動かすDockerイメージを作成します。
Dockerfileを作成
|
1 2 3 4 5 6 7 8 9 10 |
FROM python:3.12-slim WORKDIR /app COPY requirements.txt . RUN pip install --no-cache-dir -r requirements.txt COPY locustfile_api_test.py . ENTRYPOINT ["locust", "-f", "locustfile_api_test.py"] |
requirements.txtを作成
|
1 |
locust |
ローカルでの動作確認
ECSにデプロイする前に、ローカルで動作確認しましょう。
|
1 2 3 4 5 6 7 8 |
# Dockerイメージをビルド docker build -t locust-api-test . # コンテナを起動(WebUIモード) # 作成したAPI GatewayのエンドポイントURLを指定 docker run -p 8089:8089 locust-api-test --host=https://abc123.execute-api.ap-northeast-1.amazonaws.com # ブラウザで http://localhost:8089 にアクセス |
WebUIが表示されたら成功です!
ECRにイメージをプッシュ
|
1 2 3 4 5 6 7 8 9 10 11 12 13 |
# ECRリポジトリを作成 aws ecr create-repository --repository-name locust-api-test # ECRにログイン aws ecr get-login-password --region ap-northeast-1 | \ docker login --username AWS --password-stdin アカウントID.dkr.ecr.ap-northeast-1.amazonaws.com # イメージにタグを付ける docker tag locust-api-test:latest \ アカウントID.dkr.ecr.ap-northeast-1.amazonaws.com/locust-api-test:latest # プッシュ docker push アカウントID.dkr.ecr.ap-northeast-1.amazonaws.com/locust-api-test:latest |
セキュリティグループ設定
Locust WebUIにアクセスするためのセキュリティグループを設定します。
| ポート | プロトコル | 送信元 | 用途 |
|---|---|---|---|
| 8089 | TCP | 自分のIP/32 | WebUI |
⚠️ セキュリティ上の注意
- 本番環境では、必ず特定のIPアドレスに制限してください
- 社内ネットワークからのアクセスの場合は、会社のIPレンジを指定しましょう
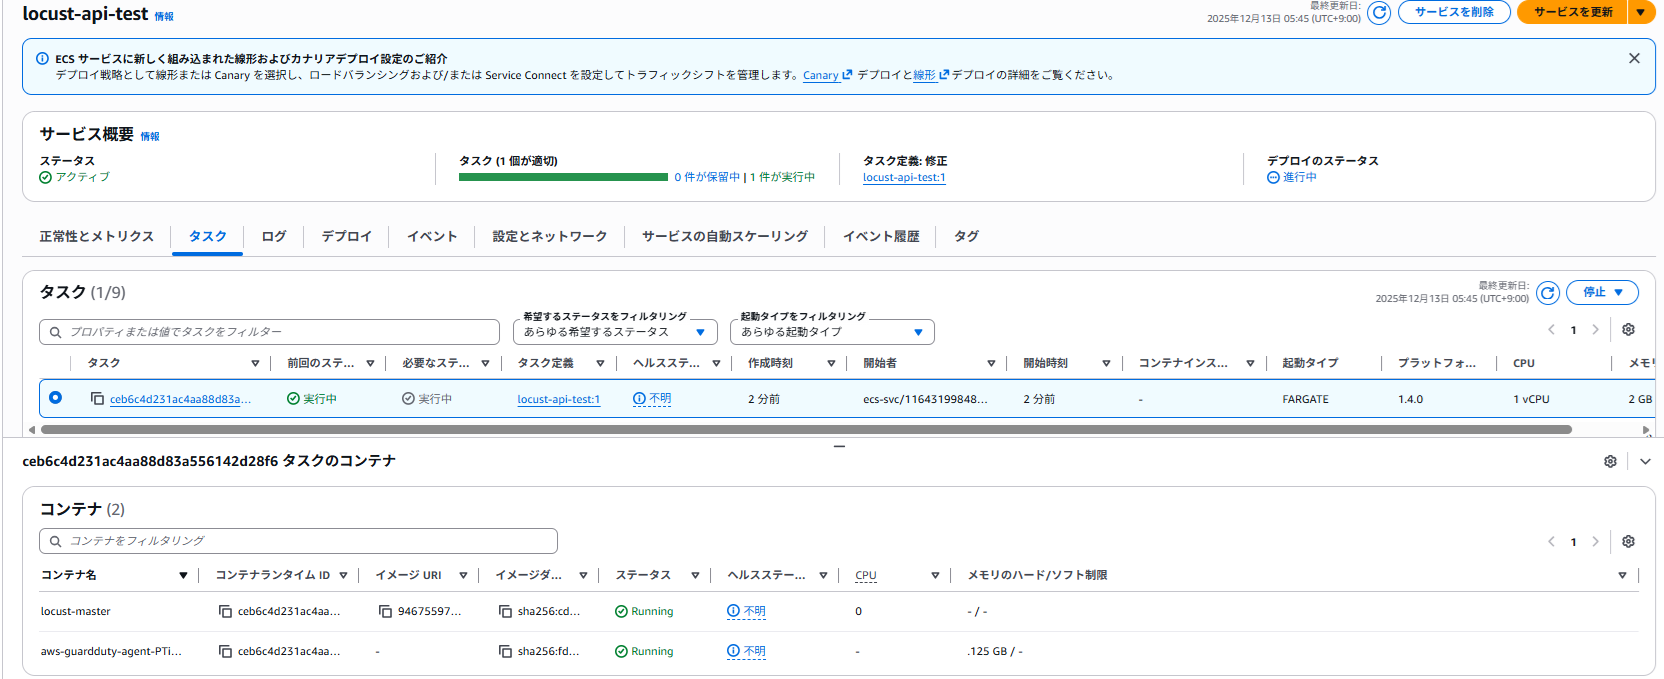
ECS環境の構築
ECSタスク定義の作成
task-definition.jsonを作成
|
1 2 3 4 5 6 7 8 9 10 11 12 13 14 15 16 17 18 19 20 21 22 23 24 25 26 27 28 29 30 31 32 33 34 35 36 37 38 39 40 |
{ "family": "locust-api-test", "networkMode": "awsvpc", "requiresCompatibilities": ["FARGATE"], "cpu": "1024", "memory": "2048", "executionRoleArn": "arn:aws:iam::アカウントID:role/ecsTaskExecutionRole", "containerDefinitions": [ { "name": "locust-master", "image": "アカウントID.dkr.ecr.ap-northeast-1.amazonaws.com/locust-api-test:latest", "essential": true, "portMappings": [ { "containerPort": 8089, "protocol": "tcp" } ], "command": [ "--host=取得したAPI GatewayエンドポイントURL", "--web-host=0.0.0.0", "--loglevel=INFO" ], "environment": [ { "name": "PYTHONUNBUFFERED", "value": "1" } ], "logConfiguration": { "logDriver": "awslogs", "options": { "awslogs-group": "/ecs/locust-api-test", "awslogs-region": "ap-northeast-1", "awslogs-stream-prefix": "locust" } } } ] } |
|
1 2 3 4 5 6 7 8 9 10 11 12 13 14 |
# タスク定義を登録 aws ecs register-task-definition --cli-input-json file://task-definition.json # クラスター作成 aws ecs create-cluster --cluster-name locust-test-cluster # サービスを作成 aws ecs create-service \ --cluster locust-test-cluster \ --service-name locust-api-test \ --task-definition locust-api-test \ --desired-count 1 \ --launch-type FARGATE \ --network-configuration "awsvpcConfiguration={subnets=[subnet-xxxxx],securityGroups=[sg-xxxxx],assignPublicIp=ENABLED}" |
ECS FargateでLocustを動かす準備が出来ました。
負荷テストの実行
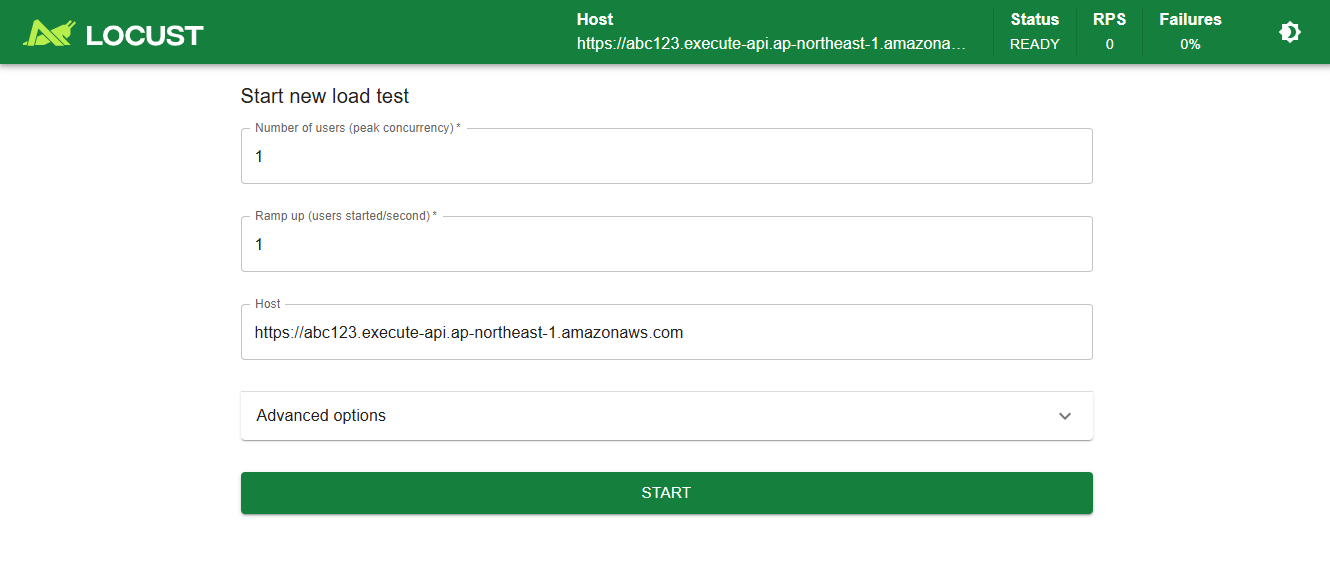
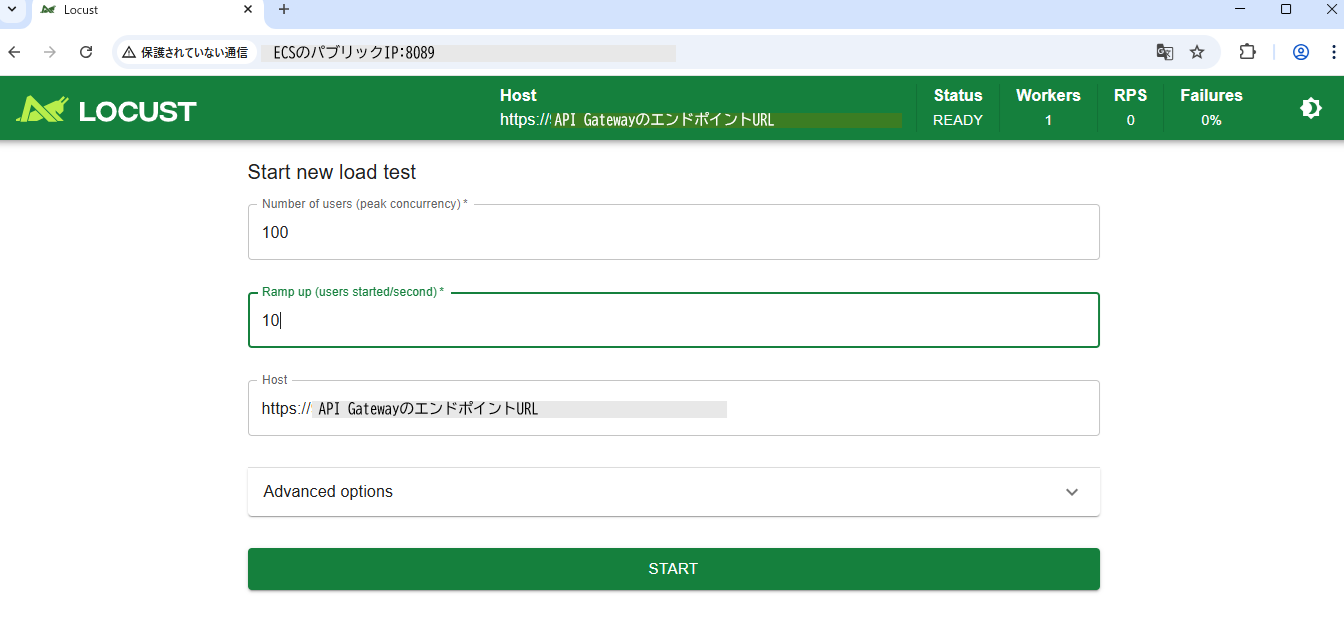
WebUIを使った実行
- ECSタスクのパブリックIPを確認
- ブラウザで
http://ECSのパブリックIPアドレス:8089にアクセス - 以下を入力:
- Number of users: 100(同時接続ユーザー数)
- Spawn rate: 10(1秒あたりに追加するユーザー数)
- 「Start swarming」ボタンをクリック
ヘッドレスモード(WebUIなし)での実行
自動化したい場合は、ヘッドレスモードが便利です。
タスク定義のcommandを以下に変更:
|
1 2 3 4 5 6 7 |
"command": [ "--headless", "--host=https://取得したAPI GatewayエンドポイントURL", "-u", "100", "-r", "10", "-t", "5m" ] |
-u: ユーザー数-r: 増加率(spawn rate)-t: テスト実行時間
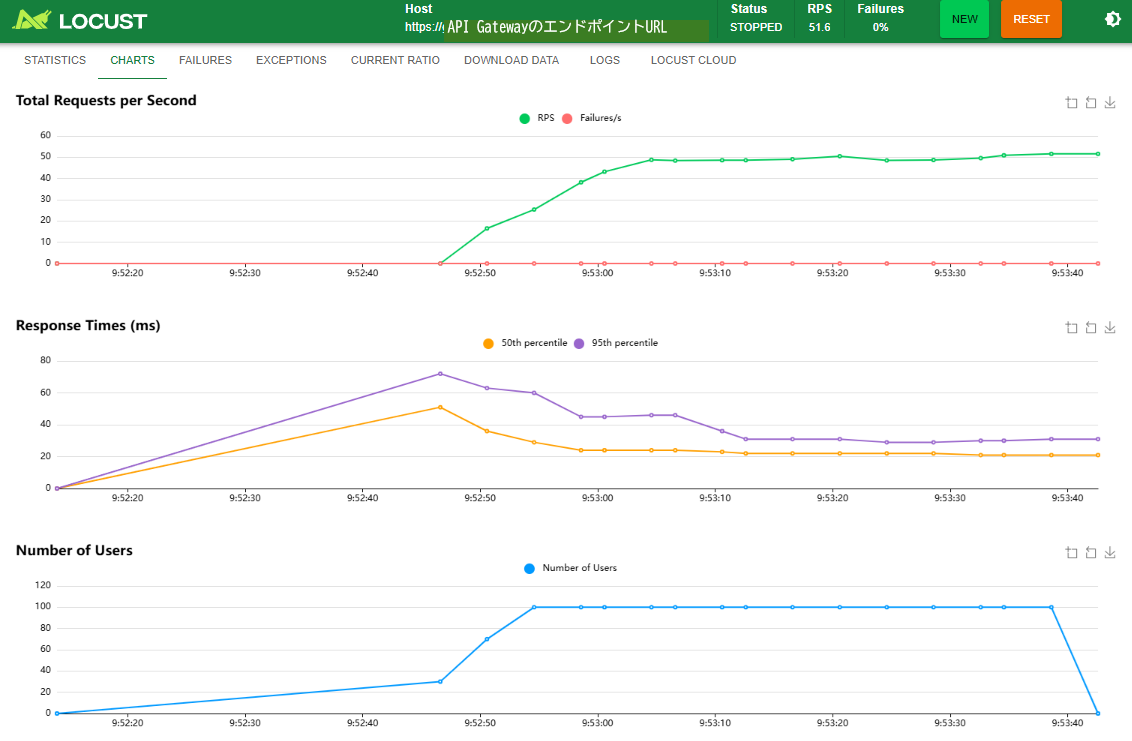
負荷テスト結果確認
負荷テストを実行した結果、以下のような結果を確認できました。

負荷試験の結果を、僕の良き相棒の、Amazon Qに分析してもらいました。
負荷テスト結果分析レポート
📊 総合評価: A+ (優秀)
| 指標 | 結果 | 評価 | 基準 |
|---|---|---|---|
| 失敗率 | 0% | 🟢 優秀 | < 1% |
| 平均応答時間 | 25.96ms | 🟢 優秀 | < 100ms |
| 95パーセンタイル | 41ms | 🟢 優秀 | < 500ms |
| スループット | 51.6 RPS | 🟢 高性能 | - |
🔍 詳細分析
テスト結果サマリー
| Type | Name | # Requests | # Fails | Median (ms) | 95%ile (ms) | 99%ile (ms) | Average (ms) | Min (ms) | Max (ms) | Average size (bytes) | Current RPS | Current Failures/s |
|---|---|---|---|---|---|---|---|---|---|---|---|---|
| GET | /api/users | 1,269 | 0 | 23 | 42 | 64 | 25.61 | 16 | 318 | 118 | 27 | 0 |
| POST | /api/users | 440 | 0 | 22 | 40 | 75 | 26.09 | 17 | 300 | 61 | 9.5 | 0 |
| GET | /api/users/1 | 814 | 0 | 22 | 41 | 72 | 26.43 | 16 | 377 | 57 | 15.1 | 0 |
| Aggregated | - | 2,523 | 0 | 22 | 41 | 66 | 25.96 | 16 | 377 | 88.38 | 51.6 | 0 |
1. 応答時間パフォーマンス
- 中央値: 22ms (50%のリクエストが22ms以内)
- 95パーセンタイル: 41ms (95%のリクエストが41ms以内)
- 99パーセンタイル: 66ms (99%のリクエストが66ms以内)
- 最大値: 377ms (一時的なスパイクあり)
2. エンドポイント別パフォーマンス
|
1 2 3 |
GET /api/users : 25.61ms平均 (1,269リクエスト) - 27 RPS POST /api/users : 26.09ms平均 (440リクエスト) - 9.5 RPS GET /api/users/1 : 26.43ms平均 (814リクエスト) - 15.1 RPS |
結果: 全エンドポイントで一貫した高性能を実現
3. スループット分析
- 総RPS: 51.6 req/s
- 総リクエスト数: 2,523
- 実行比率: GET:POST:GET詳細 ≈ 3:1:2 (設計通り)
- データ転送: 平均88.38 bytes/request
🎯 ベンチマーク比較
| 項目 | 今回結果 | 一般的な目標 | 達成率 |
|---|---|---|---|
| 応答時間 | 25.96ms | < 200ms | ✅ 87%改善 |
| 95%ile | 41ms | 99.9% | ✅ 100%達成 |
| 失敗率 | 0% | < 1% | ✅ 完全成功 |
📈 スケーラビリティ予測
現在の性能から推定される処理能力:
- 1分間: 約3,100リクエスト
- 1時間: 約186,000リクエスト
- 1日: 約450万リクエスト
- 月間: 約1.35億リクエスト
⚠️ 注意点と改善提案
1. 最大応答時間のスパイク
問題: 377msの最大応答時間
- 原因: Lambda冷却起動の可能性
- 対策:
- Provisioned Concurrency設定
- メモリ増加 (128MB → 256MB)
2. 負荷レベル
現状: 比較的軽い負荷での結果
- 提案: より高負荷でのテスト実施
123Users: 100-500Duration: 10-30分Ramp-up: 段階的負荷増加
3. 監視強化
推奨設定:
- CloudWatch メトリクス追加
- X-Ray トレーシング有効化
- カスタムメトリクス設定
🚀 次のステップ
短期的改善 (1-2週間)
-
Lambda最適化
- メモリ設定: 128MB → 256MB
- タイムアウト: 30秒 → 15秒
- 環境変数最適化
-
高負荷テスト実施
- 同時ユーザー数: 100-500
- 実行時間: 30分
- 段階的負荷増加
中期的改善 (1-2ヶ月)
- Provisioned Concurrency導入
- API Gateway キャッシュ設定
- CloudFront導入検討
長期的改善 (3-6ヶ月)
- 分散負荷テスト環境構築
- CI/CD統合
- 自動パフォーマンス監視
🎉 結論
API Gateway + Lambda構成は優秀な結果を示しました
✅ 100%成功率 - 完全な可用性を実現
✅ 25.96ms平均応答 - 非常に高速なレスポンス
✅ 51.6 RPS - 高いスループットを達成
✅ サーバーレス - 管理不要で運用コスト削減
この結果は、サーバーレスアーキテクチャでも高いパフォーマンスと信頼性を実現できることを証明しています。
📋 アクションアイテム
| 優先度 | アクション | 担当 | 期限 |
|---|---|---|---|
| 高 | Lambda メモリ増加 | DevOps | 1週間 |
| 高 | 高負荷テスト実施 | QA | 2週間 |
| 中 | Provisioned Concurrency検討 | Architecture | 1ヶ月 |
| 低 | 監視ダッシュボード作成 | DevOps | 2ヶ月 |
と、Amazon Qは分析してくれました!
こんな時は...トラブルシューティング
タスクが起動しない
- CloudWatch Logsでエラーを確認
- セキュリティグループの設定を確認
- ECRイメージのプルに失敗していないか確認
APIにリクエストが届かない
- ネットワーク設定(VPC、サブネット)を確認
- NATゲートウェイの設定を確認(プライベートサブネットの場合)
- APIのセキュリティグループでECSからのアクセスを許可
応答時間が遅い
- ECSタスクのCPU/メモリを増やす
- Workerを追加してリクエストを分散
- APIサーバー側のスケーリング設定を確認
まとめ
ECS Fargateで負荷テストツールLocustを動かして、APIに負荷をかける方法をやってみました。
おさらい
✅ LocustはPythonで簡単に負荷テストシナリオを書ける
✅ ECS Fargateでサーバー管理不要で実行できる
✅ WebUIで結果をリアルタイムに確認できる
次のステップ
- Locustの分散実行機能(Master-Worker構成)で負荷試験してみる
- より複雑なシナリオを作成してみる
- CloudWatch Metricsと連携して監視を強化
- カスタムレポートの作成
負荷テストは、システムの性能を把握し、ボトルネックを発見するために重要です。ぜひ、この記事を参考に実際に試してみてください!
次回のブログでは、Master-Worker構成の検証をしてみたいと思います。
参考リンク
投稿者プロフィール
-
2023/1にスカイアーチネットワークスにJoin
AWSを日々勉強中