はじめに
前回の続きとなります。
https://www.skyarch.net/blog/?p=18393
前回までで、AWS IoTサービスへセンサ値をPublish出来たため
今回はShadowを利用して、LED状態の管理をしてみます。
出来たもの
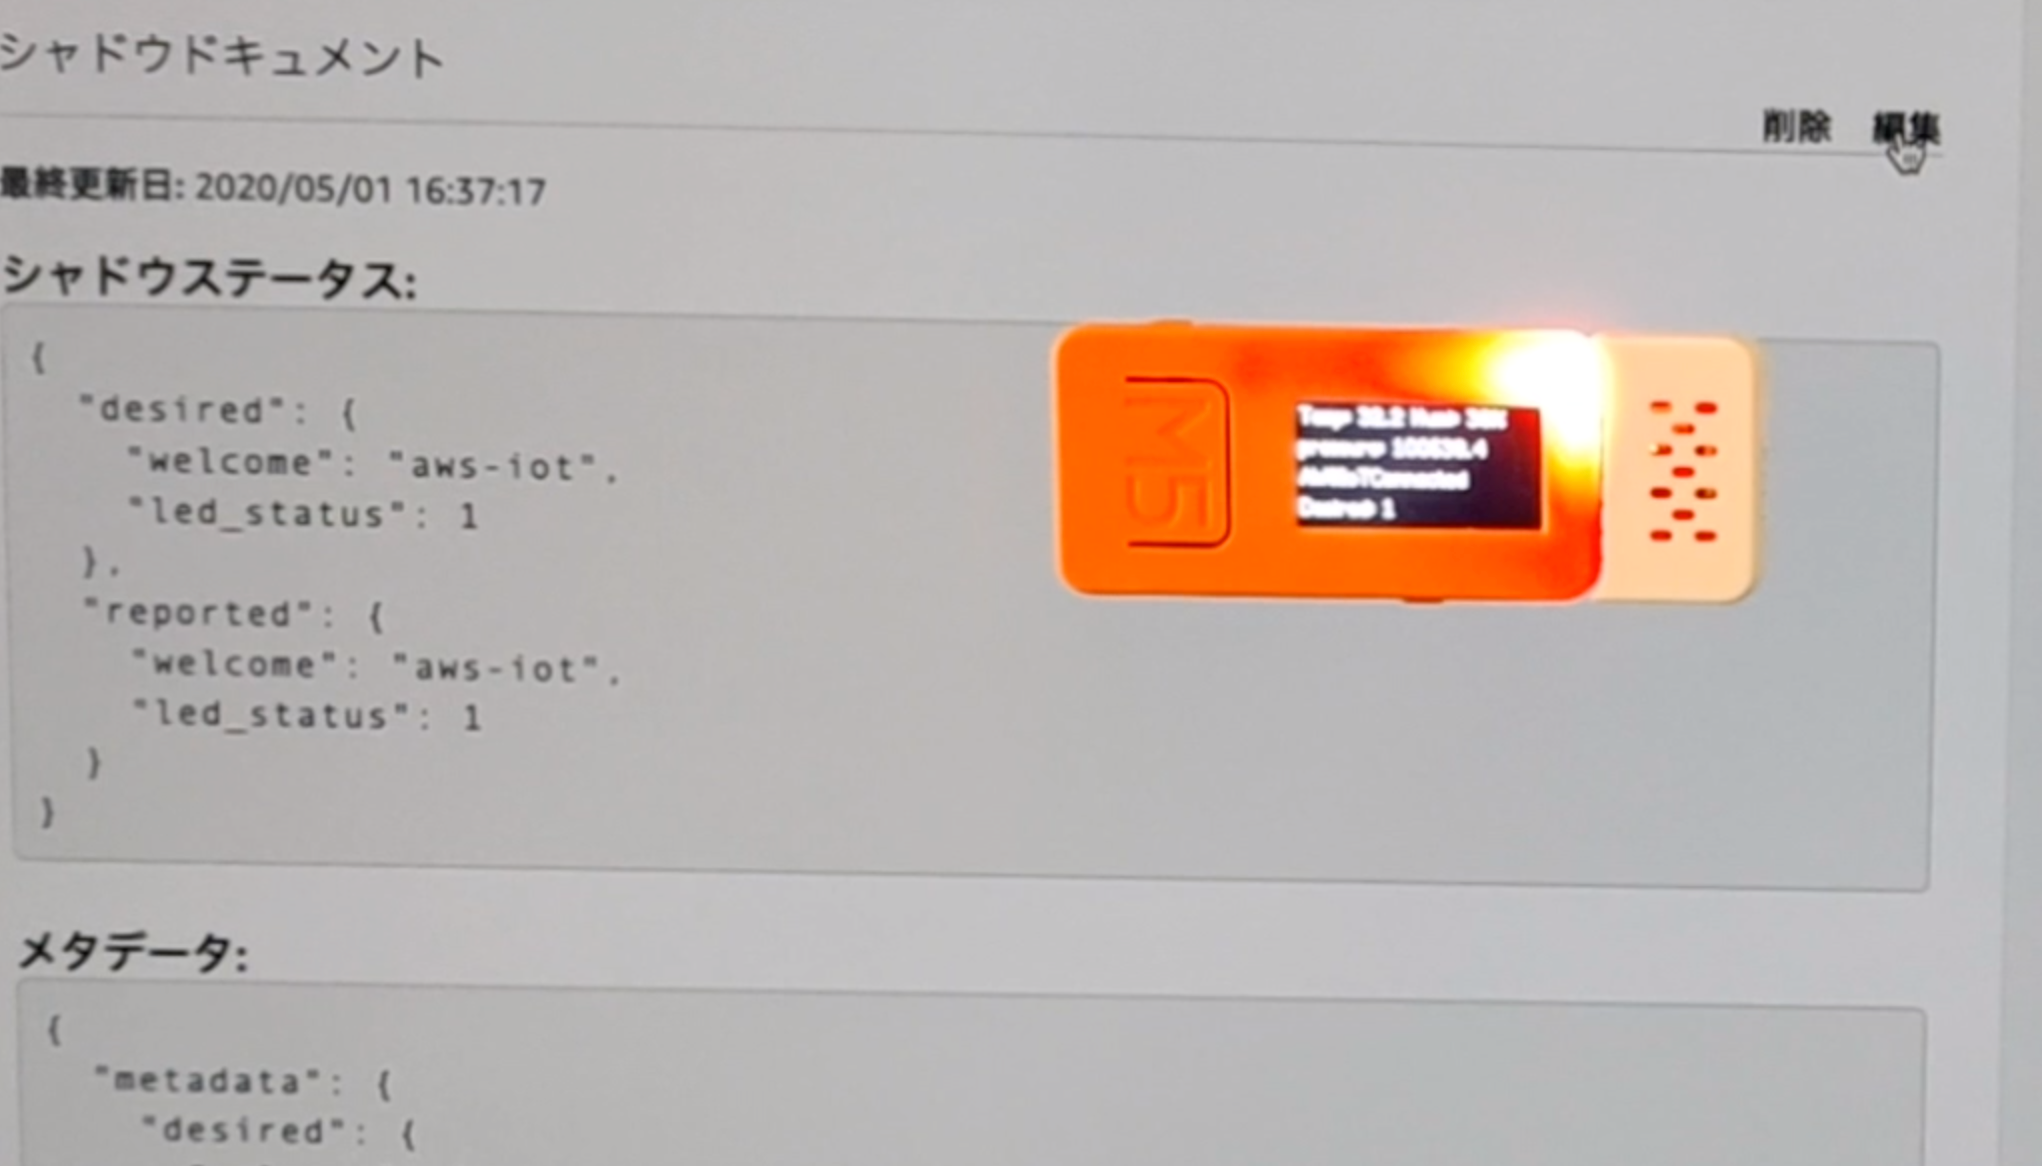
Shadowドキュメントを更新する事でDeltaを発生させデバイス側LEDを制御
左側のウィンドウ
AWS IoT ⇢ モノ ⇢ シャドウ
にて下記シャドウステータスの desired 内、led_status を 1 に更新すると、deltaが発生しデバイスが受信してLEDを付ける
led_statusを 0 に更新すると、LEDが消えます。
|
1 2 3 4 5 6 7 8 9 10 |
{ "desired": { "welcome": "aws-iot", "led_status": 0 }, "reported": { "welcome": "aws-iot", "led_status": 0 } } |
右側のウィンドウ
テスト ⇢ MQTTクライアントにて下記トピックをサブスクライブしています。
このため delta が発生した際に、デバイス側が受信(Subscribeしている)するトピック内容となります。
$aws/things/M5Stick01/shadow/update/delta
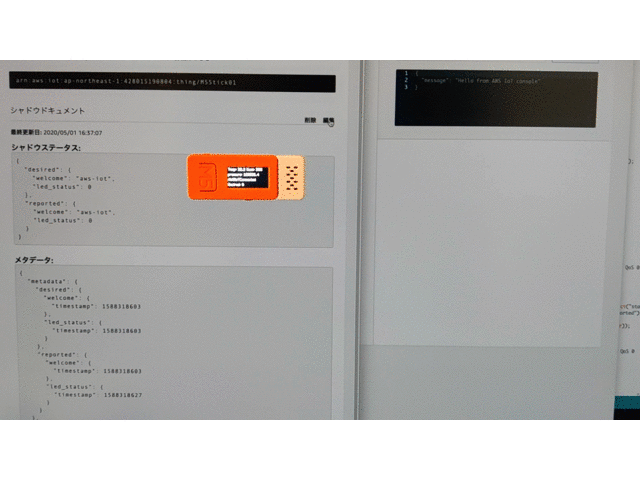
デバイス側でLEDステータスを変化させてもDeltaが発生しShadowドキュメント状態に収束する
デバイス側では、自身のLED点灯/消灯情報をFlagのような形で持っており
およそ5秒に1回、その状態を Shadowに reportedとして通知しています。
このため、Shadowドキュメント内では desired が 消灯 にも関わらず
デバイス側で点灯されると、desired と reportedに deltaが発生
受信したデバイスが desiredの状態にLEDを点灯/消灯し合わせるという形です。
このあたりの挙動はdesiredをnullとして送信する事で変更できそうですね。
https://docs.aws.amazon.com/ja_jp/iot/latest/developerguide/device-shadow-document.html
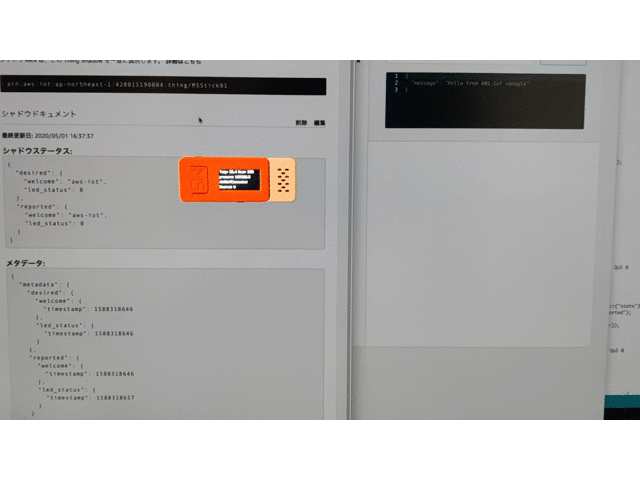
左側のウィンドウ
AWS IoT ⇢ モノ ⇢ シャドウ
にてシャドウステータスを確認していますが、シャドウドキュメントの更新は行っていません。
右側のウィンドウ
テスト ⇢ MQTTクライアントにて下記トピックをサブスクライブしています。
手動でLED状態を変更すると、deltaが発生します。
$aws/things/M5Stick01/shadow/update/delta
目次
手順の概要
- AWS IoTで モノ/証明書/ポリシーを作成し適切な関連にAttach (AWS CLIにて実施) 前回までに実施
- AWS IoTで Shadowドキュメントを変更
- PubSubClientヘッダファイル変更
- コード書く/転送
M5StickCで利用するライブラリ等
前回と同様
参考にさせて頂いた記事
ESP32でAWS IoTに繋いでThing Shadowを弄る
https://blog.maripo.org/2017/07/esp32-aws-iot/
ESP32 Arduino: Timer interrupts
https://techtutorialsx.com/2017/10/07/esp32-arduino-timer-interrupts/
実行環境
MacOS上で実施しました。
手順
2. AWS IoTで Shadowドキュメントを変更
作成したモノのシャドウドキュメントで初期値は色々入っておりますが、シンプルにled_statusのみとします。
"welcome": "aws-iot" は消せなかったため。
|
1 2 3 4 5 6 7 8 9 10 |
{ "desired": { "welcome": "aws-iot", "led_status": 0 }, "reported": { "welcome": "aws-iot", "led_status": 0 } } |
3. PubSubClientヘッダファイル変更
私のPCでは下記場所にありました。
/Users/[自分のユーザ名]/Documents/Arduino/libraries/PubSubClient/src/PubSubClient.h
Mac/Linuxでしたら下記にて検索出来ると思います。
|
1 2 |
$ cd $ sudo find . -name 'PubSubClient.h' |
ファイル内の下記を書き換えます。
サイズオーバすると、Callback関数内も実行されずDebugが難しいためお気をつけ下さい。
|
1 2 3 |
#define MQTT_MAX_PACKET_SIZE 128 ↓ #define MQTT_MAX_PACKET_SIZE 1024 |
4. コード書く/転送
下記の [] 括弧部分をご自身の物に書き換える必要があります。
詳細は前回の記事をご覧下さい。
https://www.skyarch.net/blog/?p=18393
コード
およそ5秒毎にデータをAWSIoTへ送信しております
タイマーを割り込みにて処理しています。
|
1 2 3 4 5 6 7 8 9 10 11 12 13 14 15 16 17 18 19 20 21 22 23 24 25 26 27 28 29 30 31 32 33 34 35 36 37 38 39 40 41 42 43 44 45 46 47 48 49 50 51 52 53 54 55 56 57 58 59 60 61 62 63 64 65 66 67 68 69 70 71 72 73 74 75 76 77 78 79 80 81 82 83 84 85 86 87 88 89 90 91 92 93 94 95 96 97 98 99 100 101 102 103 104 105 106 107 108 109 110 111 112 113 114 115 116 117 118 119 120 121 122 123 124 125 126 127 128 129 130 131 132 133 134 135 136 137 138 139 140 141 142 143 144 145 146 147 148 149 150 151 152 153 154 155 156 157 158 159 160 161 162 163 164 165 166 167 168 169 170 171 172 173 174 175 176 177 178 179 180 181 182 183 184 185 186 187 188 189 190 191 192 193 194 195 196 197 198 199 200 201 202 203 204 205 206 207 208 209 210 211 212 213 214 215 216 217 218 219 220 221 222 223 224 225 226 227 228 229 |
/* note: need add library Adafruit_BMP280 from library manage Github: https://github.com/adafruit/Adafruit_BMP280_Library */ #include <M5StickC.h> #include "DHT12.h" #include <Wire.h> #include "Adafruit_Sensor.h" #include <Adafruit_BMP280.h> #include <ArduinoJson.h> #include <WiFiClientSecure.h> #include <PubSubClient.h> // PubSubClient.h 実ファイルのMQTT_MAX_PACKET_SIZEを1024等に設定する必要があります // https://github.com/knolleary/pubsubclient // Wifi Settings const char* ssid = "[ご自身の環境のWifiSSID]"; const char* password = "[ご自身の環境のWifiPassowrd]"; // AWS IoT Settings const char* endpoint = "[ご自身のAWSアカウントのIoTエンドポイント]"; // 東京リージョンなら右記のような形 xxxx-ats.iot.ap-northeast-1.amazonaws.com const int port = 8883; const char* pubTopic = "[適当なTopic名 - 記事中では envTopic としていました]"; const char* clientId = "[適当なデバイス名 - 記事中では M5Stick01 としていました]"; // char pubTopicShadow[128]; char subTopicShadow[128]; #define QOS_SUB 0 const char* rootCA = \ "-----BEGIN CERTIFICATE-----\n" \ "...\n" \ // [ご自身で取得したRootCA] "-----END CERTIFICATE-----\n"; const char* clientCert = \ "-----BEGIN CERTIFICATE-----\n" \ "...\n" \ // [上記CLIコマンドで生成したデバイス用証明書] "-----END CERTIFICATE-----\n"; const char* clientPrivateKey = \ "-----BEGIN RSA PRIVATE KEY-----\n" \ "...\n" \ // [上記CLIコマンドで生成したデバイス用秘密鍵] "-----END RSA PRIVATE KEY-----\n"; // Wifi/Network WiFiClientSecure httpsClient; PubSubClient mqttClient(httpsClient); char buffer[1024]; // Timer interrupts // https://techtutorialsx.com/2017/10/07/esp32-arduino-timer-interrupts/ volatile int interruptCounter; hw_timer_t * timer = NULL; portMUX_TYPE timerMux = portMUX_INITIALIZER_UNLOCKED; void IRAM_ATTR onTimer() { portENTER_CRITICAL_ISR(&timerMux); interruptCounter++; portEXIT_CRITICAL_ISR(&timerMux); } // LED_PIN #define M5_STICK_PIN_LED 10 boolean ledState = true; // HIGH: LED Off/Low: LED On // ENV HAT DHT12 dht12; Adafruit_BMP280 bme; void checkWiring() { while (!bme.begin(0x76)) { M5.Lcd.fillScreen(BLACK); M5.Lcd.setCursor(0, 0, 2); M5.Lcd.println("Could not find a valid BMP280 sensor, check wiring!"); delay(1000); } } void reconnect() { while (!mqttClient.connected()) { if (mqttClient.connect(clientId)) { M5.Lcd.setCursor(0, 40, 2); M5.Lcd.println("AWSIoTConnected"); mqttClient.subscribe(subTopicShadow, QOS_SUB); } else { M5.Lcd.setCursor(0, 40, 2); M5.Lcd.printf("AWSIoTConnect Failed. state=%d", mqttClient.state()); // Wait 5 seconds before retrying delay(5000); } } } void mqttCallback(char* topic, byte* payload, unsigned int length) { // JSON Parse payload[length] = '\0'; String json = String((char*) payload); // Debug JSON in SerialConsole Serial.println(json); StaticJsonDocument<1024> docShadowDesired; DeserializationError error = deserializeJson(docShadowDesired, json); M5.Lcd.setCursor(0, 60, 2); if (error) { M5.Lcd.printf("deserializeJson Failed"); } else { if (sizeof(docShadowDesired["state"]["led_status"]) > 0) { M5.Lcd.printf("Desired: %d", int(docShadowDesired["state"]["led_status"])); ledState = !boolean(docShadowDesired["state"]["led_status"]); digitalWrite(M5_STICK_PIN_LED, ledState); } else { M5.Lcd.printf("Desired: corrupted value"); } } } void setup() { // put your setup code here, to run once: M5.begin(); M5.Lcd.setRotation(3); M5.Lcd.fillScreen(BLACK); // Timer timer = timerBegin(0, 80, true); timerAttachInterrupt(timer, &onTimer, true); timerAlarmWrite(timer, 5000000, true); timerAlarmEnable(timer); // I2C Wire.begin(0,26); // GPIOSetup pinMode(M5_STICK_PIN_LED, OUTPUT); digitalWrite(M5_STICK_PIN_LED, ledState); // check ENVHat checkWiring(); // WifiSetup //// Avoid Connect Error (JIC) WiFi.disconnect(true); delay(1000); //// Connect WiFi.begin(ssid, password); while (WiFi.status() != WL_CONNECTED) { delay(500); } M5.Lcd.setCursor(0, 40, 2); M5.Lcd.printf("Wifi Connected"); // Configure MQTT Client httpsClient.setCACert(rootCA); httpsClient.setCertificate(clientCert); httpsClient.setPrivateKey(clientPrivateKey); mqttClient.setServer(endpoint, port); mqttClient.setCallback(mqttCallback); // pubTopic/subTopic sprintf(pubTopicShadow, "$aws/things/%s/shadow/update", clientId); sprintf(subTopicShadow, "$aws/things/%s/shadow/update/delta", clientId); // Debug topic name in SerialConsole Serial.printf("pubTopicShadow=%s\n", pubTopicShadow); Serial.printf("subTopicShadow=%s\n", subTopicShadow); } void loop() { // update button state M5.update(); // Button Pressed if (M5.BtnA.wasReleased()) { // turnOn/Off LED ledState = !ledState; digitalWrite(M5_STICK_PIN_LED, ledState); } // check ENVHat checkWiring(); // reconnect if (!mqttClient.connected()) { reconnect(); } mqttClient.loop(); // Timer Interrupt execute Every 5sec if (interruptCounter > 0) { Serial.println("Timer interrupted"); // CounterReset portENTER_CRITICAL(&timerMux); interruptCounter--; portEXIT_CRITICAL(&timerMux); // display Temp/Humidity/Pressure float tmp = dht12.readTemperature(); float hum = dht12.readHumidity(); M5.Lcd.setCursor(0, 0, 2); M5.Lcd.printf("Temp: %2.1f Humi: %2.0f%%", tmp, hum); float pressure = bme.readPressure(); M5.Lcd.setCursor(0, 20, 2); M5.Lcd.printf("pressure: %2.1f", pressure); // create JSON DynamicJsonDocument docEnv(1024); JsonObject data = docEnv.createNestedObject("env"); data["temperture"] = tmp; data["humidity"] = hum; data["pressure"] = pressure; serializeJson(docEnv, buffer, sizeof(buffer)); // Debug JSON in SerialConsole Serial.println(buffer); // Publish - The client only supports publishing at QoS 0 mqttClient.publish(pubTopic, buffer); // report current LED status to ShadowTopic // create JSON DynamicJsonDocument docShadowReport(1024); JsonObject state = docShadowReport.createNestedObject("state"); JsonObject reported = state.createNestedObject("reported"); reported["led_status"] = int(!ledState); serializeJson(docShadowReport, buffer, sizeof(buffer)); // Debug JSON in SerialConsole Serial.println(buffer); // Publish - The client only supports publishing at QoS 0 mqttClient.publish(pubTopicShadow, buffer); } // wait delay(500); } |
コード上のポイントとなる処理
- センサ値取得は、ENV HAT用のサンプルスケッチからほぼ変えていません。
- タイマーに関しては、参考ブログから拝借した内容となります。
Shadow Topicのパブリッシュ/サブスクライブ
clientIdを元にTopicエンドポイント名を生成しています。
|
1 2 3 4 5 |
void setup() { // pubTopic/subTopic sprintf(pubTopicShadow, "$aws/things/%s/shadow/update", clientId); sprintf(subTopicShadow, "$aws/things/%s/shadow/update/delta", clientId); ... |
パブリッシュ
現在のデバイス状態(LED点灯状況)をShadowにてレポートするため5秒毎に
LEDの点灯/消灯状態変数を元にJSONドキュメントを生成し、Publishしています。
生成されるJSONは下記のようになります。
{"state": {"reported" : {"led_status" : 0}}}
|
1 2 3 4 5 6 7 8 9 10 11 12 13 14 15 16 17 18 |
void loop() { ... // Timer Interrupt execute Every 5sec if (interruptCounter > 0) { .. // report current LED status to ShadowTopic // create JSON DynamicJsonDocument docShadowReport(1024); JsonObject state = docShadowReport.createNestedObject("state"); JsonObject reported = state.createNestedObject("reported"); reported["led_status"] = int(!ledState); serializeJson(docShadowReport, buffer, sizeof(buffer)); // Debug JSON in SerialConsole Serial.println(buffer); // Publish - The client only supports publishing at QoS 0 mqttClient.publish(pubTopicShadow, buffer); ... |
サブスクライブ
サブスクライブ設定を行うと、コールバック関数にトピック名、メッセージ、メッセージ長が通知されます。
通知されたメッセージを、char型からString型にキャストし、deserializeを実施しています。
取得したJSON内の数値を、booleanに変換し出力しています。
※M5StickのLED接続I/OピンがHighだと消灯/Lowだと点灯のため反転する必要あり
|
1 2 |
ledState = !boolean(docShadowDesired["state"]["led_status"]); digitalWrite(M5_STICK_PIN_LED, ledState); |
関連コード部分
|
1 2 3 4 5 6 7 8 9 10 11 12 13 14 15 16 17 18 19 20 21 22 23 24 25 26 27 28 29 30 31 32 33 34 |
void mqttCallback(char* topic, byte* payload, unsigned int length) { // JSON Parse payload[length] = '\0'; String json = String((char*) payload); // Debug JSON in SerialConsole Serial.println(json); StaticJsonDocument<1024> docShadowDesired; DeserializationError error = deserializeJson(docShadowDesired, json); M5.Lcd.setCursor(0, 60, 2); if (error) { M5.Lcd.printf("deserializeJson Failed"); } else { if (sizeof(docShadowDesired["state"]["led_status"]) > 0) { M5.Lcd.printf("Desired: %d", int(docShadowDesired["state"]["led_status"])); ledState = !boolean(docShadowDesired["state"]["led_status"]); digitalWrite(M5_STICK_PIN_LED, ledState); } else { M5.Lcd.printf("Desired: corrupted value"); } } } void setup() { ... mqttClient.setCallback(mqttCallback); ... void reconnect() { while (!mqttClient.connected()) { if (mqttClient.connect(clientId)) { ... mqttClient.subscribe(subTopicShadow, QOS_SUB); |
投稿者プロフィール

-
Japan AWS Ambassadors 2023, 2024
開発会社での ASP型WEBサービス企画 / 開発 / サーバ運用 を経て
2010年よりスカイアーチネットワークスに在籍しております
機械化/効率化/システム構築を軸に人に喜んで頂ける物作りが大好きです。