In this blog, we will be using Selenium WebDriver (Java) for my example codes.
And please note that the codes here are not tested. These are only guides and are not intended for any other purpose.
In simple words, page objects in selenium mimics the page's UI controls/objects so we can use it to interact with the page easily.
Think of the page as an object-oriented class, that is exactly what page object pattern is. The page object class serves as interface to a page of your application. It hides away the page-specific code implementations like the locators.
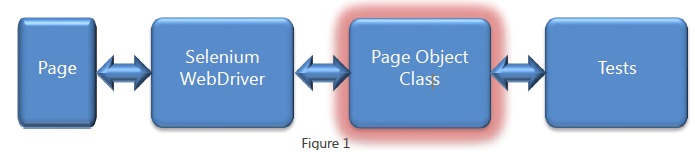
Image taken from Page Object Pattern & Page Factory
We will use this class along with the selenium webdriver to interact with its UI.
Before we start building page objects for our tests, here are some pros and cons to know.
Pros:
- Your AUT's UI becomes loosely coupled from the actual test. Hence;
- Minimizing test code complexity.
- Removes redundancy.
Con:
- Your code will be a little hard to read as your objects will be behind an abstraction.
Creating a simple Page Object Class
Say we have a Login Page to test and the page has 3 UI objects we need to interact with.
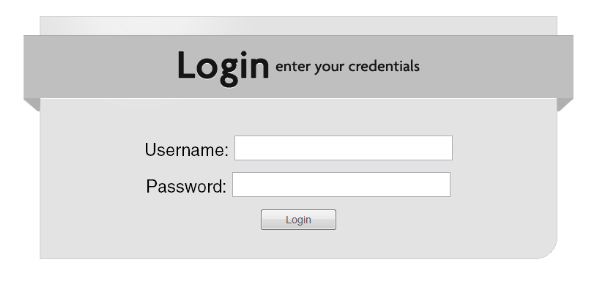
We would want to create a simple page object class containing each of the UI object as field/property.
package com.skyarch.PageObjects;

import org.openqa.selenium.WebDriver;
import org.openqa.selenium.WebElement;
import org.openqa.selenium.support.FindBy;
import org.openqa.selenium.support.How;

public class LoginPage {

    @FindBy(how = How.NAME, using = "username")
    private WebElement username;

    @FindBy(how = How.NAME, using = "password")
    private WebElement password;

    @FindBy(how = How.ID, using = "login")
    private WebElement login;
}
When writing the actual test, you can simply initilize the page object using the initElements method of PageFactory.
import org.openqa.selenium.support.PageFactory;

LoginPage page = PageFactory.intElements(driver,LoginPage.class)
Using the objects is fairly the same as you would have when you were not using the page object pattern.
page.username.sendKeys("zuckerberd");
page.username.sendKeys("dadada");
page.login.click();
Now that is plainly better than doing this.
driver.findElement(By.name("username")).sendKeys("zuckerberd");
driver.findElement(By.name("password")).sendKeys("dadada");
driver.findElement(By.id("login")).click();
Now our lives are better with the page object pattern in our tests, isn't it? 🙂
But wait...
What if your page object class is getting bigger and your AUT's pages are having framework generated names and other stuffs that make us suffer?
Here is where we want to create our own locators, alternate to the ones that Selenium gives us.
For our team, we wanted to locate elements on the page by using the best readable identifiers like labels or placeholders, button texts, etc. We could not do this because we cannot assign a dynamic value for the annotation (in java).
Now you're thinking, why not just use xpath instead of creating a custom ElementLocator for the PageFactory?
Yes, we will be using XPath, but that doesn't solve the problem of complicating our page object classes when they get bigger.
Creating a custom ElementLocator will abstract those long and hard to read, redundant XPaths, leaving us with only labels on the class, or maybe a little count of Xpaths, which is way better than reading the whole XPath when you only want to know where that object points to on the page.
And not only we can create a custom ElementLocator, we can also create a custom FieldDecorator, giving us the power to fully customize our page object classes.
For instance we have a page that contains select or the select2 plugin boxes, datetime pickers, and other input plugins you can think of, and we wanted to create a simple, readable and uncomplicated page object.
 public class ScheduledMessengerPage {

     @FindBy(label="Send to:")
     private Select2 userSelect2;

     @FindBy(label="Subject:")
     private WebElement subject;

     @FindBy(label="Body:")
     private WYSIWYG contentBody;

     @FindBy(label="Scheduled For:")
     private DateTimePicker scheduleFor;

     @FindBy(label="Schedule Message")
     private WebElement submit;
 }
We cannot do this without extending the ElementLocator and FieldDecorator.
While extending these classes, we can create new interfaces and classes that will contain all the methods for the custom objects in our AUT's page. Don't worry, we can extend the WebElement interface. 🙂
Well, now I can say that our lives are better! 😀
Customizing the Page Object
Before we begin this journey of customizing our page object pattern, let's enumerate what we want to achieve.
- Our test page objects are more readable when it gets bigger and bigger.
- We will be able to locate or map elements with their labels.
- We can include objects for custom plugins on the page without complicating our page object classes. And create encapsulated methods for them.
List of things we need to do:
- Custom Class implementing ElementLocatorFactory
- Custom Class extending AbstractAnnotations
- Custom Class implementing FieldDecorator
- A Class implementing InvocationHandler; for our custom object
- A public annotation interface
We will be using Java's string formatting in locating our elements.
In some other classes, you might just want to extend the default ones Selenium provided.
1. Creating Custom Class implementing ElementLocatorFactory
The ElementLocatorFactory interface only implements one method.
public interface ElementLocatorFactory {
 ElementLocator createLocator(Field field);
}
This interface will be the one to give the PageFactory a custom locator, the findElement and findElements. This is needed because we are mapping our page objects with an @Annotation.
We will use our own annotation interface to map our page objects, and use this annotation to identify if the page object needs to be located by using our custom ElementLocator, else give it to the default handlers of Selenium.
package com.skyarch.PageObjects;

import java.lang.reflect.Field;

import org.openqa.selenium.SearchContext;
import org.openqa.selenium.support.pagefactory.Annotations;
import org.openqa.selenium.support.pagefactory.ElementLocator;
import org.openqa.selenium.support.pagefactory.ElementLocatorFactory;
import org.openqa.selenium.support.pagefactory.DefaultElementLocator;

import com.skyarch.PageObjects.Annotations.FindBy;

public class CustomElementLocatorFactory implements ElementLocatorFactory {

    private final SearchContext searchContext;

    public CustomElementLocatorFactory(SearchContext context) {
        this.searchContext = context;
    }

    @Override
    public ElementLocator createLocator(Field field) {
        FindBy annotation = field.getAnnotation(FindBy.class);

        if (annotation == null) {
            // if our annotation is not present give it to selenium's defaults
            return new DefaultElementLocator(this.searchContext, new Annotations(field));
        }
        return new CustomElementLocator(this.searchContext, new CustomAnnotation(field));
    }
}
With this, we can redirect all our page objects annotated with our custom annotation to our custom ElementLocator.
2. Now let's create our Custom Class extending AbstractAnnotations
This class is the one responsible in building the XPath and return a By that our CustomElementLocator will use to locate the page object.
For this step, we will just extend from the default Annotations Class Selenium provided as we only need to customize the XPath builder of the class.
package com.skyarch.PageObjects;

import java.lang.reflect.Field;
import java.util.Arrays;

import org.openqa.selenium.By;
import org.openqa.selenium.support.pagefactory.Annotations;

import com.skyarch.PageObjects.Annotations.FindBy;

public class CustomAnnotation extends Annotations {
    private Field field;

    public CustomAnnotation(Field field, String xpathFormat, String xpathPrefix) {
        super(field);
        this.field = field;
    }

    @Override
    public By buildBy() {
        By locateBy = null;
        FindBy findBy = field.getAnnotation(FindBy.class);

        if (findBy == null) {
            locateBy = super.buildByFromDefault();
            return locateBy;
        }

        String xpath;
        // lets check if there are multiple parameters
        if (findBy.params().length > 0) {
            Object[] objs = Arrays.copyOf(findBy.params(), findBy.params().length, Object[].class);
            xpath = String.format(findBy.format(), objs);
        }
        else {
            xpath = String.format(findBy.format(), xpathPrefix, findBy.param());
        }
        locateBy = By.xpath(xpath);

        if (locateBy == null) {
            throw new IllegalArgumentException("Cannot determine how to locate element " + field);
        }
        return locateBy;
    }
}
3. Custom Class implementing FieldDecorator
Now this class is the most important, this is the one that casts the page objects into the Interface (as a Proxy class) we want them to be.
This will be called by PageFactory for every single object in our page object class that is being initialized.
It first gets the ElementLocator given by the ElementLocatorFactory. Then casts the page object field into a Proxy instance of, in Selenium's default a WebElement.
In this step, we can add our custom page objects (select, etc.). Yehey!
We will also be extending the DefaultFieldDecorator.
Note: Example custom page objects are in the Side Quest section.
package com.skyarch.PageObjects;

import java.lang.reflect.Field;
import java.lang.reflect.InvocationHandler;
import java.lang.reflect.Proxy;
import java.util.List;

import org.openqa.selenium.WebDriver;
import org.openqa.selenium.WebElement;
import org.openqa.selenium.support.pagefactory.DefaultFieldDecorator;
import org.openqa.selenium.support.pagefactory.ElementLocator;
import org.openqa.selenium.support.pagefactory.ElementLocatorFactory;

import com.skyarch.PageObjects.CustomElements.Handlers.SelectElementWrapperHandler;
import com.skyarch.PageObjects.CustomElements.Interfaces.SelectInput;

public class CustomFieldDecorator extends DefaultFieldDecorator {

    public CustomFieldDecorator(ElementLocatorFactory factory) {
        super(factory);
    }

    @Override
    public Object decorate(ClassLoader loader, Field field) {
        // this part is where we pre-filter the acceptable interfaces for our page objects
        if (!(WebElement.class.isAssignableFrom(field.getType())
            || String.class.isAssignableFrom(field.getType())
            || SelectInput.class.isAssignableFrom(field.getType()) // this will be our example custom object
            || List.class.isAssignableFrom(field.getType())
            || isDecoratableList(field))) {
          return null;
        }

        ElementLocator locator = factory.createLocator(field);
        if (locator == null) {
          return null;
        }
        if (List.class.isAssignableFrom(field.getType())) {
            return proxyForListLocator(loader, locator);
        } else if (SelectInput.class.isAssignableFrom(field.getType())) {
            return proxySelectForLocator(loader, locator);
        } else if (WebElement.class.isAssignableFrom(field.getType())) {
            return proxyForLocator(loader, locator);
        } else {
          return null;
        }
      }

    protected SelectInput proxySelectForLocator(ClassLoader loader, ElementLocator locator) {
        InvocationHandler handler = new SelectElementWrapperHandler(locator);

        SelectInput proxy;
        proxy = (SelectInput) Proxy.newProxyInstance(
            loader, new Class[]{SelectInput.class}, handler);
        return proxy;
    }
}
Note that SelectInput here is a custom interface to support the Selenium's Select class.
What we need is our Proxy InvocationHanler class for SelectInput object to finally work.
4. A Class implementing InvocationHandler, Let's create that!
Before this, please read more about Java Proxy Class.
This class will be the one that handles our method calls for our proxy page objects. It will call locator.findElement() or locator.findElements() and then invokes the method to it.
And this is where we cast the WebElement into whatever object we want it to be. In this case, a CustomSelect (Select) Object.
package com.skyarch.PageObjects.CustomElements.Handlers;

import java.lang.reflect.InvocationHandler;
import java.lang.reflect.InvocationTargetException;
import java.lang.reflect.Method;

import org.openqa.selenium.WebElement;
import org.openqa.selenium.support.pagefactory.ElementLocator;

import com.skyarch.PageObjects.CustomElements.CustomSelect;

public class SelectElementWrapperHandler implements InvocationHandler {
    private final ElementLocator locator;

    public SelectElementWrapperHandler(ElementLocator locator) {
        this.locator = locator;
    }

    @Override
    public Object invoke(Object proxy, Method method, Object[] args) throws Throwable {
        WebElement element;
        try {
            element = locator.findElement();
        } catch (Exception e) {
            if ("toString".equals(method.getName())) {
                return "Proxy select(element) for: " + locator.toString();
            }
            else throw e;
        }
        CustomSelect el = new CustomSelect(element);

        try {
            return method.invoke(el, args);
        } catch (InvocationTargetException e) {
            throw e.getCause();
        }
    }
}
Note that the CustomSelect class is a class extending Selenium's Select class and implementing SelectInput, we need to do this because we need the class to be implementing our SelectInput interface.
5. Let's not forget our annotation. A public annotation interface
package com.skyarch.PageObjects.Annotations;

import java.lang.annotation.ElementType;
import java.lang.annotation.Retention;
import java.lang.annotation.RetentionPolicy;
import java.lang.annotation.Target;

@Retention(RetentionPolicy.RUNTIME)
@Target({ElementType.FIELD, ElementType.TYPE})
public @interface FindBy {
      String format() default "";
      String param() default "";
      String[] params() default {};
}
You can change the class name so you will not be confused with Selenium's @FindBy annotaion.
Now we can declare a page object by:
@FindBy(format = "//label[text()='%s']/following-sibling::select", param = "Select Gender:")
public SelectInput drpGender;
You can also customize it more, so you will have a declaration that looks something like:
@FindByFormat(format = "//label[text()='%s']/following-sibling::select") // this format will apply to all following @FindBy Annotation until a new @FindByFormat
@FindBy(param = "Select Gender:")
public SelectInput drpGender;</pre>
<pre>@FindBy(param = "Select City:")
public SelectInput drpCity;</pre>
<pre>@FindBy(param = "Select Town:")
public SelectInput drpTown;</pre>
<pre>
You can customize it more to fit your needs. This is only a guide and a proof that you can do it your way.
Thank you for reading. Sayōnara!
Side Quest
I will give some examples on how we can create classes for our custom page objects.
CustomSelect Class
package com.skyarch.PageObjects.CustomElements;

import org.openqa.selenium.By;
import org.openqa.selenium.WebElement;
import org.openqa.selenium.support.ui.Select;

import com.skyarch.PageObjects.CustomElements.Interfaces.SelectInput;

public class CustomSelect extends Select implements SelectInput {

    public CustomSelect(WebElement element) {
        super(element);
    }

    /*
     * Selects multiple text, applies only to multiple select
     */
    @Override
    public void selectByVisibleText(String... texts) {
        for (String text : texts) {
            super.selectByVisibleText(text);
        }
    }
    // more custom methods here...
}
SelectInput Interface
package com.skyarch.PageObjects.CustomElements.Interfaces;
import java.util.List;
import org.openqa.selenium.WebElement;
public interface SelectInput {
boolean isMultiple();
List&amp;amp;amp;lt;WebElement&amp;amp;amp;gt; getOptions();
List&amp;amp;amp;lt;WebElement&amp;amp;amp;gt; getAllSelectedOptions();
WebElement getFirstSelectedOption();
void selectByVisibleText(String text);
void selectByIndex(int index);
void selectByValue(String value);
void deselectAll();
void deselectByValue(String value);
void deselectByIndex(int index);
void deselectByVisibleText(String text);
void selectByVisibleText(String...texts);
}