この記事の日本語版は翻訳中です
PowerShell is good to start with, you can do some seriously powerful stuff with it. Like performing a variety of tasks in Azure. PowerShell provides cmdlets to manage Azure. You can use the cmdlets to perform the same tasks that you can perform through the Azure Management Portal. For example create and configure Windows Azure Virtual Machine.
Note: To use Azure cmdlets you must have Windows Azure PowerShell modules that requires Microsoft .NET Framework 4.5 and Powershell 3.0
How to create a Windows Azure Virtual Machine with PowerShell?
I created a script, so that I don't need to do it manually every time I want to create Windows Azure Virtual Machine with PowerShell. So step one was creating a script, and below is the powershell cmdlets I used for my script.
0. Your global variable
$SubscriptionName = "SUBSCRIPTION NAME"
$SourceImage = "IMAGE SOURCE"
$ServiceLocation = "SERVICE LOCATION"
$DNSName = "VM DNS NAME"
$VMName = "VM NAME"
$VMSize = "VM SIZE"
$VMUser = "VM USER"
$VMPassword = "VM PASSWORD"
$StorageAccountName = "STORAGE ACCOUNT"
To get your $SubscriptionName, type in your powershell console
(Get-AzureSubscription).SubscriptionName
As part of the above process I had to specify an image name ($SourceImage) for the virtual machine to be based on - you can look these up easily with the
Get-AzureVMImage > C:\imagelist.txt
This will return a list of all available images which you can filter your way through as you need. For example, I was using a Server 2012 image which had an imagename of "a699494373c04fc0bc8f2bb1389d6106__Windows-Server-2012-Datacenter-201412.01-en.us-127GB.vhd".
Virtual Machine size $VMSize = "Small, Medium, Large, and etc" see https://msdn.microsoft.com/en-us/library/azure/dn197896.aspx for more details.
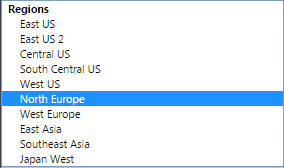
And for your $ServiceLocation, see image below.
1. Add Azure Account Details.
# The cmdlets need your subscription so they can manage your services.
Add-AzureAccount
Set-AzureSubscription -SubscriptionName $SubscriptionName
2. Provision Storage Account.
New-AzureStorageAccount -StorageAccountName $StorageAccountName -Location $ServiceLocation -Type "Standard_LRS"

# Set storage account as default one, otherwise you will not be able to build your VM
Set-AzureSubscription -SubscriptionName $SubscriptionName -CurrentStorageAccount $StorageAccountName
3. Create an Azure Virtual Machine.
New-AzureVMConfig -Name $VMName -InstanceSize $VMSize -ImageName $SourceImage.Trim() | Add-AzureProvisioningConfig -Windows -AdminUsername $VMUser -Password $VMPassword | New-AzureVM -ServiceName $DNSName -Location $ServiceLocation -WaitForBoot
4. Waiting for Virtual Machine to reach status "ReadyRole" then edit the Endpoint,
so you can use powershell to remote your VM.
Do {}While ((Get-AzureVM -Name $VMName -ServiceName $DNSName).status -ne "ReadyRole")

Get-AzureVM -ServiceName $DNSName -Name $VMName | Set-AzureEndpoint -Name "PowerShell" -PublicPort 5986 -LocalPort 5986 -Protocol "tcp" | Update-AzureVM
And here are the other cmdlets you can use to manage your VM.
# Stop, start or restart the VM
Stop-AzureVM -Name $VMName -ServiceName $DNSName
Start-AzureVM -Name $VMName -ServiceName $DNSName
Restart-AzureVM -Name $VMName -ServiceName $DNSName

# Remove VM, cloud service and storage account
Remove-AzureVM -Name $VMName -ServiceName $DNSName
Remove-AzureVM -ServiceName $DNSName
Remove-AzureStorageAccount -StorageAccountName $StorageAccountName
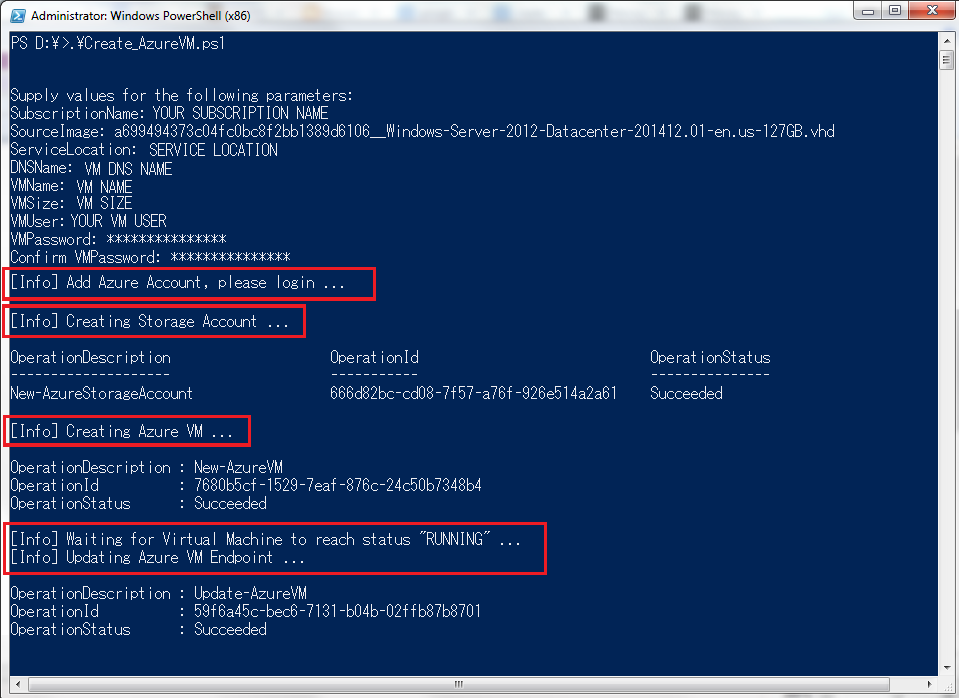
You are good to go as easy as it is!. Here how I run my script.
Run Powershell console as Administrator
type Set-ExecutionPolicy RemoteSigned -Force
then .\Create_AzureVM.ps1
投稿者プロフィール
最新の投稿
 AWS2021年12月2日AWS Graviton3 プロセッサを搭載した EC2 C7g インスタンスが発表されました。
 セキュリティ2021年7月14日ゼロデイ攻撃とは
- セキュリティ2021年7月14日マルウェアとは
- WAF2021年7月13日クロスサイトスクリプティングとは?